PETER HART THE CAMERA TRAP
PETER HART THE CAMERA TRAP
The video sequence or the photographic still can be an invaluable teaching aid… so long as you get the right shot and know what you’re looking at. Peter Hart has advice both for the photographer and ‘photographee.’
With PETER HART
(This feature originally appeared in the January February 2015 issue of Windsurf Magazine. To read more features like this first, Print and Digital subscriptions are available. Prices include delivery globally for 10 x issues a year!)
You may be an exception but the improvement graph of most windsurfers starts with a steady upward path; but then suddenly looks like the heart activity of a dying man on a defibrillator – flat lines interspersed with vertical spikes – which makes it exciting and frustrating …but probably more the latter. The secret lies in understanding what was responsible for those joyous spikes. What made you suddenly put the back foot in the strap? Drop forward rather than lean back into a carve gybe? Turn the head to look down the wave as you turned off the lip?
There is no one answer of course – nevertheless I’m going to give you one – it’s feedback.
At beginner level you get plenty of it. The light wind arena is closed and safe. The proximity of a mentor dissipates anxiety – the greatest learning inhibitor. Communication is easy and although the incoherent mate who’s teaching you doesn’t know his luff from his leech, some of the information is useful even if it’s limited to opening and closing doors and sticking your bum in. But with a decent teacher, the scenario is not so different from getting your forehand drilled by a tennis coach – thanks to his or her constant verbal tweaking or demonstrating, bad habits never have a chance to engrain themselves.
But as the wind increases and you bump onto the plane, your windsurfing universe expands. And with every metre you skim gloriously away from the shore, the chance of useful feedback reduces. To prevent technical stagnation, you have to keep the feedback channels open. But how?
Go on a clinic, he said with no hint of self-interest, where you’ll luxuriate in a hot tub of feedback, but you can’t be on one all the time. As you seek to improve, the best place to look is upwards. How do the pros break down the barriers? Apart from privilege, opportunity and instinctive brilliance their greatest and least heralded talent is their ability to self-coach. For the vast majority, the video is as an indispensable tool. To master the most complex moves, you have to be acutely aware of where you, rig and body have to be at every stage of the move. It’s not just a ‘crash, burn, learn’ approach. They really put the ‘anal’ in ‘analysis, scrutinising every frame of the footage like a biologist picking through the carcass of a dead rat.
Quizzed on the subject, the first comment I got from Ben Profitt was “it’s pretty much the way I learn everything.” (See elsewhere in this article a more detailed account of his method.)
“ As moves get harder, the window for error turns into a slit. For the vast majority of pros, the video is an indispensable tool ”
What the video brings
Used well, the video is as multi-functional as a Swiss Army knife.
It’s the rewind button for your muscle memory.
“Reg … do you remember that jump you did about half an hour ago? Well you took off about 10º too far into wind… you don’t remember? OK … whatever.”
The problem with live feedback, especially in wild seas where it’s not convenient to keep coming in and out, is that it’s delayed. The video jogs the memory, gives you a visual reference and makes the feedback relevant.
It closes the gap between perception and ego-busting reality.
What we think we’re doing is rarely what we are doing. Frank was a good gyber – on the flat waters of Dahab’s Baby Bay at least – but he hardly ever bent his knees, which is a key element in controlling the arc and being able to pressure the edge evenly though chop.
He came in after a series of planing dry ones seeking praise and affirmation. I pointed out the straight leg thing. He couldn’t have been more incandescent if I’d suggested he drove like a pensioner. “I think you’ll find I did.” He sniffed.
The video playback revealed the naked truth. The thing is he did bend his knees, ever so slightly, as he initiated. But as the board tilted over, the legs straightened again – he didn’t remember that bit. Being able to relate the feeling to the picture is a massive help.
Fault-finding and positive reinforcement
Video allows you to keep on practising after the event. Pawing over sequences again and again reveals more and more details of good and bad and really puts you in touch with what’s going on. But the camera is just a tool and just as you can write rubbish with a beautiful fountain pen, it’s worse than useless in the wrong hands.
Here’s a typical postmodern windsurfing preparation routine. Arrive. Park. Stare at sea/lake. Assess wind strength. Jog back to car avoiding eye contact with Geoffrey, the resident boffin who will otherwise engage you in a 20 minute one way discussion about foil flex percentages. Rig, change, launch – total time so far, 11 minutes and 24 seconds. But now add a further 90 minutes for activities under the general heading of ‘briefing film crew and setting up Point of View cameras. Everyone is at it and great it is too. But where you point them depends whether you want to just make a movie or get some technical feedback.
Movie Maker or Teaching Aid?
Jamie, not his real name, presents himself on many clinics. I treasure his company but every now and then we have a minor falling-out (hence the pseudonym … I don’t want to upset him) over the subject of video.
The conversation would go something like: “Harty, did you get that last wave ride? I think it was my best ever!”
“Absolutely!” I said knowing full well that the only sequence I had got of Jamie was of him mistiming a top turn. And so lying I at least postponed his wrath until the naked truth was revealed at video replay session. I tried to stem the flow of abuse by pointing out that I was his coach, not his personal videographer. Of course I would love to have caught that life-affirming moment – but actually the role of the video in a coaching context is primarily to show what you can’t do – not what you can.
Two other things made Jamie hard to film. In a crowded spot, he’d go way out to sea and so was very hard to pick up on the way back in. And if the rider disappears for long periods, the cameraman is likely to get distracted or daydream. It’s so much easier to film someone who stays in constant view. Also, it turned out Jamie performed his ‘ride of the day’ way downwind. He wasn’t sailing to the camera, he was just sailing. It was a one-way relationship. More about that in a minute.
The sudden availability and affordability of amazing devices along with the influence of social media has definitely changed people’s relationship with the camera. As soon as it comes out, they either hide for fear of finding themselves looking like a clown on Facebook or they try to show off and perform their trademark ‘banker’ moves.
So lets isolate the elements of a meaningful video session.
FILMING THE BASICS
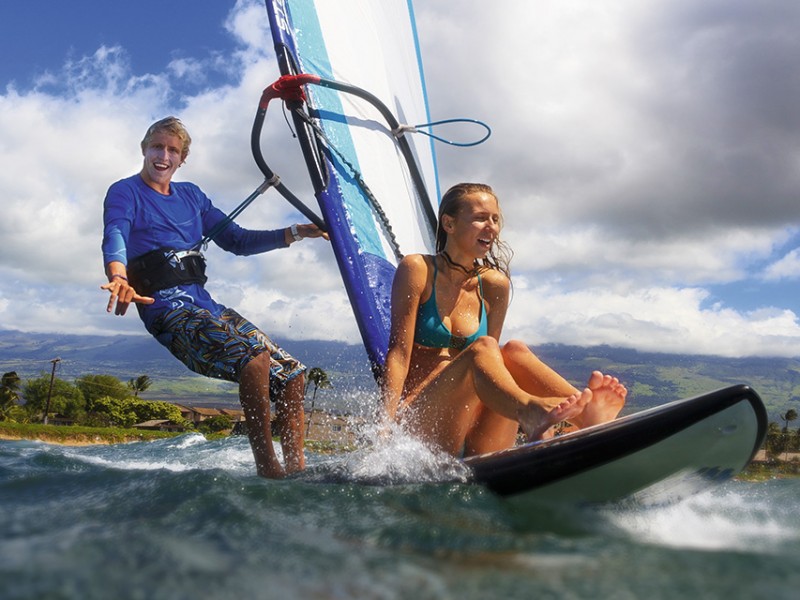
Ultimately most technical issues at intermediate level, early planing, speed, gybes etc. are kit related. I take a lot of stills and video of my clients just sailing and we scrutinise posture, how much the rig is moving, how and if the sail is self-trimming and how the board is making contact with the water; because until those things are sorted, it’s hard to move on. If you didn’t feel that comfortable it’s so useful, especially with a still shot, to relate the feeling to the picture.
![video 02]()
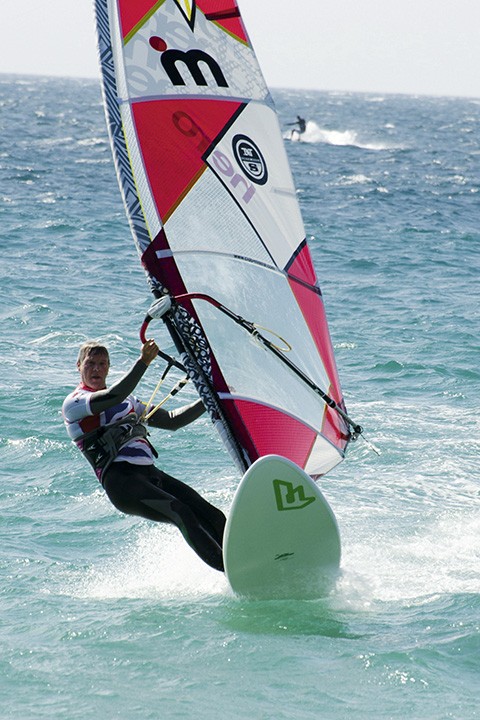
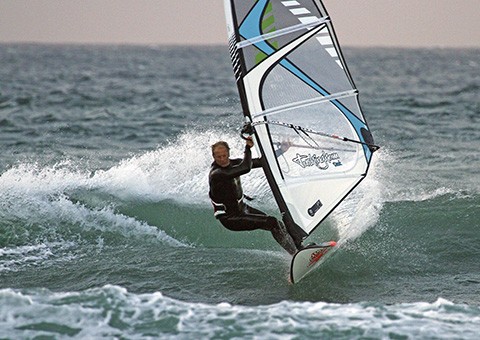
// Constant tail walking is often a set up issue. Here the still shows how a high boom and short lines are lifting the hips too high and making it hard for him to lean forward and apply mastfoot pressure. The rising harness and vertical harness lines also tell a story of discomfort.
![video 03]()
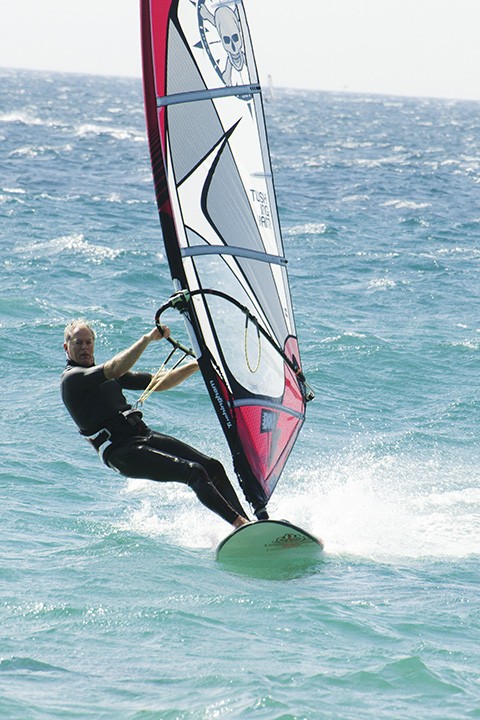
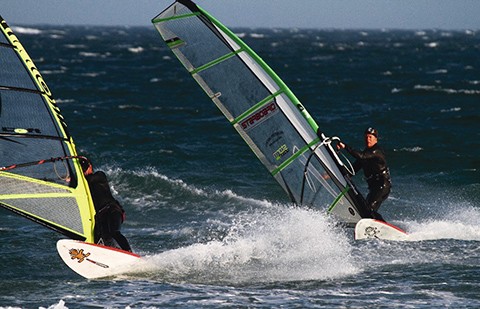
// The rig is still and the board is riding smoothly nose to tail – that tells you all you need to know. Arms parallel with the water and harness lines coming out at 90º to the body are good indications of a happy stance and good power distribution.
The Tool(s)
Until recently I was getting through about 3 camcorders a year – not through dropping them in the sea but just from using them 1000 times more than the average consumer and in an environment (damp and salty) that rarely benefits micro circuitboards. Happily the explosion of the smartphone has brought huge pressure on the domestic camcorder market so they’re now cheap as chips. But my weapon of choice is a waterproof PanasonicHX-WA30 – a bit dearer (£350 ish) than the average but it has a fighting chance of lasting a year.
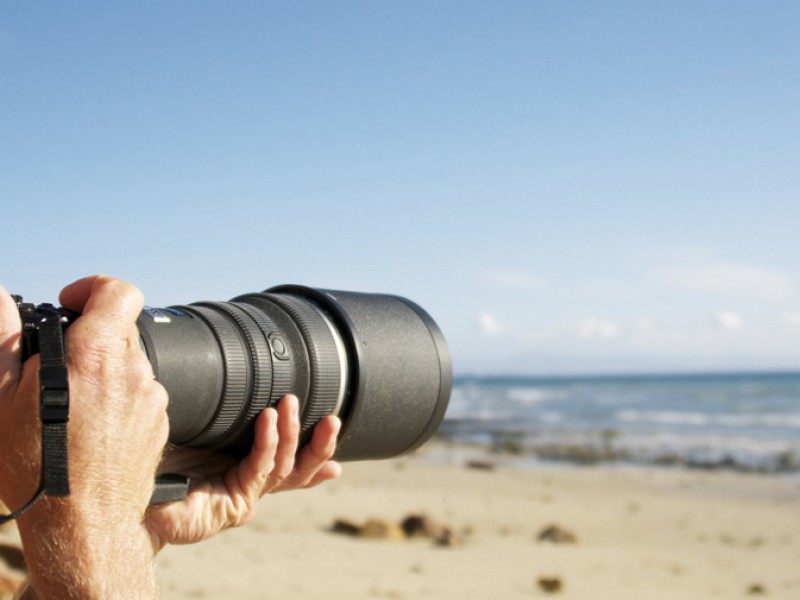
Despite their bold claims,if water smacks the domestic, flip screen ‘waterproof’ models with any force, the pressure breaks the battery seals. However it’s good enough to put down your wetsuit – and handle with wet hands – and that’s a real bonus of you’re swapping filming and sailing roles with a mate. If it’s got much less than a 15X zoom you struggle to see the detail in many situations. The big challenge is in waves where the action is frequently distant. For that I have a Digital SLR and 600ml lens which is a devastating piece of kit and frighteningly pricey– but happily a legitimate business expense. Most DSLRs now come with an HD video. The advantage is of course they have a viewfinder – so much better on sunny days than a flip LCD – and they take detachable lenses.
![video 04]()
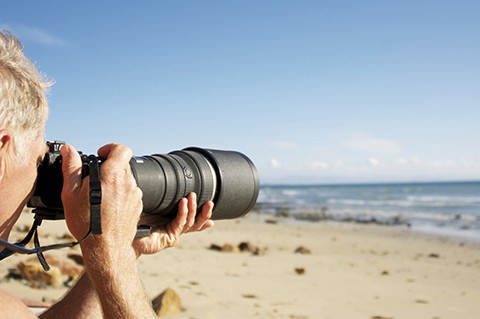
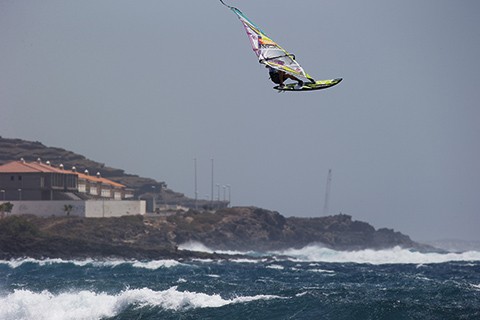
// Most digital SLRs have incredibly high quality video function. This one fitted with a 600ml lens is a fantastic tool for capturing far off wave action. But it’s also wildly expensive, heavy and quite difficult to use (no auto focus).
The relationship
There are two approaches. Getting someone to shoot you covertly so that you don’t wilt under pressure but play your natural game and display your everyday errors. The downside is that you may spend much of the session enjoying long reaches and do your interesting stuff out of range. The other approach is a planned intense session where you’re working on a specific move(s) in a specific area. As anyone who has been part of a watery photoshoot will tell you, planning and communication are key. You need to establish a set of hand signals or gestures which inform the rider to come close, go away, do it again, retire to pub time etc. Decide which angle will reveal most? How far away can you be from camera and still get some meaningful images?
This latter point is crucial. When working with people, I remind them of that advisory sign on the back of lorries – “if you can’t see me, I can’t see you.” With most cameras, if you’re more than about 100m away, you’re not going to see much. What many sailors forget is that they control the situation because they are mobile. On crowded waters keep a constant eye on the cameraman and seek out the gap so a stranger doesn’t come between you and him just as you complete your best ever whatever.
“ For much of the time in most venues, by far the most coaching potent tool is the camera. I don’t use it all the time – too much scrutiny can be inhibiting – but I cannot imagine running an effective course without one, especially as we move up the levels ” Harty
The Cameraman/woman
So who’s going to be doing the shooting? I know many non-windsurfing partners who do a good job. But when it doesn’t work so well is when a reluctant girlfriend has been dragged from a stimulating sunbed session with ‘Fifty Shades of Green’ and handed an unfamiliar camera and ordered to shoot …she’s not sure what. Funnily enough the resulting sequences of a shaky, out-of-focus, zoomed out dot doesn’t thrill the boyfriend, especially not since she was filming the wrong bloke and missed his first loop.
Windy Mates
The best person to film a windsurfer in a teaching context is another windsurfer because they know what they’re looking for and can predict the move and sudden changes of direction. The most fruitful sessions tend to involve good mates going for the same moves. One films the other and then you swap. It helps if the rivalry is under control to the extent that you both want each other to succeed. You can scrutinise the results as a team and mutually coach.
Video or Stills?
Both are good. We tend to use video because it seems to show more. However, a still of a key moment, if it’s sharp and close up can, sometimes reveal details that would be lost on video – like tense muscles, pained facial expressions, furrowed sails. Like a fine work of art, the longer you look at it, the more you see. The devil, and the angel, is often in the detail.
The Analytical Issue
There is an obvious flaw in this self-coaching master plan. You go to hospital and are shown a scan of your innards. It means absolutely nothing to you because you have no idea what you’re looking at. That is the job of the radiologist, the brand of doctor whose specific skill is detecting the smallest abnormalities that even regular doctors would miss. If I may big up the role of the professional coach for a moment –that’s where we earn our loot. We are windsurfing radiologists able to spot tiny details and get to the real root of problems. `
For example, on your video you note that you’re squatting back in your gybes, sitting on the tail. “Must lean forward” you deduce. Good. But why are you sitting back? The coach meanwhile might spot that the top 2 battens are hooking, revealing a lack of downhaul or too stiff a mast (or a mast with too stiff a tip). That stops the leech opening and releasing as you sheet in, forcing you to drop back. So what’s to be done? Well if in the same hospital the doc showed you an image of your guts and that of a healthy person, you may have a chance of spotting the problem. You need something to compare your performance with.
The ideal situation is where you’re practising in expert company. If there are pros about, film them in between your runs. If they happen to pull out the same move as the one you’re working on, perfect because they’re dealing with the same wind and water state. Failing that pull up a pro video from YouTube (or purchase a professionally made DVD – please see me after the show for details). The most fruitful video sessions I have on clinics often happen in the waves in places like Jeri where PWA pros happily (most of the time) mingle with amateurs. Here comes Tarquin doing some gentle turns – and here upwind of him on the same wave is Pedro throwing more spray than an elephant in a Jacuzzi. The differences are so obvious – not just the angles he takes up but also where he takes off on the wave, where he makes his turns, how he shoots off down the line and yet still manages to stay upwind.
Knowing what to film.
So to finish, and at the risk of turning everyone into their own guru and putting myself out of business, here are some filming and analysing tips for various moves.
Stance and set-up So many problems have their roots in the basics. Filming someone coming towards and going away from camera tells you so much. How much is the clew moving (assuming you’re not pumping)? Is the sail breaking up? Is there tension in the arms? Are you on and off the power? All of which suggest a set-up issue – too much too little out or downhaul which is preventing the sail from self-trimming.
Focus on how the board makes contact with the water – nose up nose down. Is it skimming or slamming? The latter can be a result of rig set but also boom height – too low and the balance of power shifts to the feet and the nose drops.
Too high and you often see a lot of windward leeward mast movement as you resist the rig by pulling down.
Gybes The first tip is to vary the filming angle as much as the venue allows.
One of my favoured exercises is to have people come across the wind, upwind of me. So as they initiate they should look at the camera – only possible if they drop the rig into the turn to reveal the space downwind – which in turn sheets the sail in and gets them moving in the right direction.
In the shallow lagoon environment with the waterproof camera or GoPro I get people to gybe around me. From the centre of the circle you get the best view of which foot is moving where and when.
Being able to film looking dead downwind is rare (Sotavento, Dahab etc) but gives you the best overview of the arc so you can spot the timings of rig and foot change, which are invariably too late.
Like set-ups, it’s the basics, or lack of them, you’re looking to expose. Filming from upwind, you get the best view of how you prepare and initiate the carve. Freezing just before you engage the rail will tell you all you need to know. Are you tripping over your front foot, back heel lifting anticipating the accelerating downwind? Or are you heaving the rig back on bent arms?
THE WAVE ANALYSIS
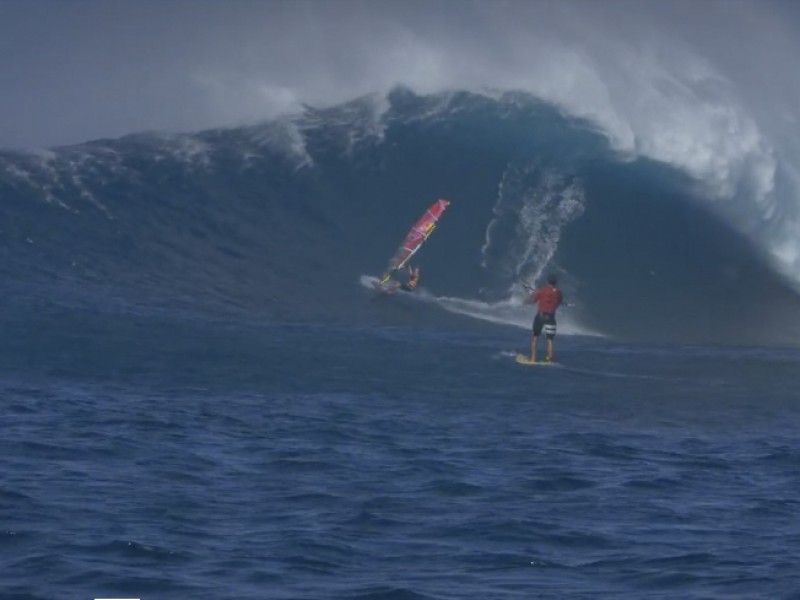
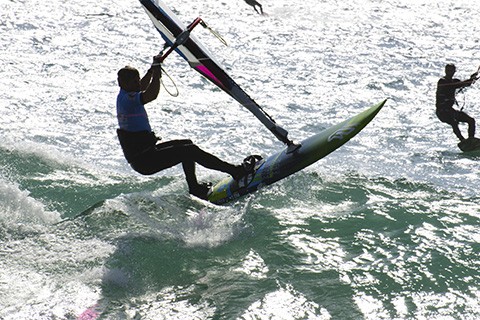
Nowhere is the feeling more divorced from the reality, than in the waves. “I’m sure I got higher than that!” “Is that as far forward as I got?” are common laments from performers reliving the action. The man in the pic below, Andy Page, is great to work with in the waves because he’s incredibly fit, is out there all day, wildly enthusiastic and is a proper radiologist and so loves a bit of analysis. His first comment looking at the pic below was “I’m leaning back … I’ve got to get more rail in the water.” Spot on – both in the bottom and top turns. On the following day, that’s exactly what he did.
![video 05]()
// Above Top It’s a great pic – Andy is absolutely in position A1 on the wave but he’s turning 100% off the tail and just using the back foot, which is almost excusable since he’s on quite a big board – but without prompting he worked out he had to project more forward.
![video 06]()
// Above Below In a lot riding situations you can gauge progress just by how much rail you lay in the water.
Tacks
It’s very easy to film tacks and upwind moves in general because they happen within a short space (Whitey’s gybes though have been known to pass through 3 counties). They’re great for video and stills because they reveal so much about your general sailing and the way you balance. Here are 4 things to analyse.
The Head. You should tack and gybe without ever looking at the mast. The moment you turn the head to eyeball the rig, is when the tack stops and plops.
Rig distance. Check the space between body and rig. The moment it closes (rig hugging) is the moment you get blocked.
The trigger. So often the first move you make sets the tone – not good if it’s a wrong one. I have in front of me a sequence taken from a clinic last week of a bloke desperate to crack the short board tack. What the video reveals so plainly is that he starts it by moving his front foot downwind off the centre-line, which immediately destabilises the board. He had NO idea he was doing it. When he moved both feet simultaneously the problem was solved.
Body shape. During the tack itself you should be rotating as if on dry land with shoulders and hips directly over the feet. What the video reveals so plainly is the little biomechanical sins such as pecking at the waist, reaching for the rig and generally trying to balance with the upper body rather than from the feet.
GO PRO FEVER
I don’t have the figures but I’m guessing 50% of planing windsurfers own a GoPro or similar rugged point of view camera. I’ve mentioned in this magazine before, how mind numbingly dull the footage can be – but used well it’s an incredible self-coaching tool. Some angles are a lot better than others. The mast mount looking down shows you all you need to know about body and foot positions in the gybe. And the back harness mount (K4 fins) tells just what you’re doing with the rig on entry. On the head or helmet I find it’s most useful for filming someone else, although because of the wide angle, you do have to be worryingly close for it to be useful.
![video 07]()
// Harty following a victim through a gybe with a head mounted GoPro – for his own safety he better not fall.
The Tricky Stuff
By the time you start using video to nail complex tricks you’re searching for the tiny visual clue to unlock the secret – but although the move is harder, the questions are much the same, where’s the wind? When do you sheet in etc. Take the forward loop – a classic move for video as blind fear usually erases all memory of the event. What you’re examining chiefly, is the angle you take off to the wind, the angle of the rig to the board and the moment at which you sheet in. What you commonly see in the forward, is a take off into wind, the rig dropped to leeward and the rider sheeting in before he’s taken off = dive over the handlebars. What you should see is take-off off the wind, rig to windward and sheeting in only once you’ve pulled the tail up and the nose has floated dead downwind.
BEN PROFIT – Video Master
One of our consistently top performers and very handy with a camera, Ben admits that he’s used video to learn pretty much everything. “One of the biggest ones for me was learning the stalled forward. As it’s all about sail and board positioning. I like to go try the move, film it, then try and get someone who can do the move to do it and film them from the same spot. Then it’s like spot the difference… it’s so easy to see where you are going wrong when done like that. I do this a lot with Justyna and it’s really helped. It’s fine someone telling you what your doing wrong but when you see it with your own eyes, that’s the moment it all clicks! I did exactly that with the stalled forward and realised I didn’t have the sail in the right position and was sheeting in too early. Well it’s a bit more complicated than that but when I filmed Ricardo I saw exactly what I was doing wrong!”
![video 08]()
// Ben stalling – the video analysis clearly worked!
And so to the waves
Video is especially useful in the waves because so much is going on to which the novice is often blind. In the early stages, the challenge is tactical as you try to manoeuvre to the right spot, dodge the mines and catch the right wave. Often I will leave the camera on wide so the victim can see the bigger picture, see how and where the waves were breaking and where he should have been. Trepidation makes you eyeball the area straight ahead. But so much of wave sailing relies on you lifting the head, taking in the whole scene, anticipating trouble (and joy) and making smart spontaneous decisions. A typical case is heading out, getting trashed by a pitching wall and then seeing on video that if you headed just 5 metres downwind you would have floated over an unbroken wall.
WHITEY – a strangely astute self-analyst
Dave White lives on both sides of the lens these days – but despite his love of taking pics and video, he is still desperate to improve his own sailing and rarely goes out without a Point of View camera pointed at his lithe frame. Here are his thoughts on using the camera to coach. “Simple, put a f-hot mast mount and Gopro on your mast, press record and forget about it. Why forget? If you’re sailing for the video you’re really concentrating on correcting mistakes. But if you forget about it you’re more likely to show your instinctive bad habits – and they’re the ones you need to sort out. I went out to do some forwards recently and they looked pretty good. But then the next day I was out practicing gybes and stuff. A couple of waves arrived up and I popped a forward without thinking. The GoPro then really showed what I was doing wrong. It’s the same with my gybes. When I’m not thinking, the GoPro showed that I let go of the rig completely in the rig change, which is not a great habit.”

// Whitey from the mast tip – “front arm a little too bent and try to soften that front knee a bit mate …”(but he still probably came out of it at 40 knots!)
And if you keep ending up miles downwind, get your mate to film the whole circuit in and out. Compare it to that of the local hotshot and see where you’re losing ground. It may suddenly be so obvious. They bore away as they launched and planed through the downwind rip inshore. You didn’t. When they were off the plane, they really stuffed it upwind. You bogged downwind. On the wave after every downwind bottom turn they cut back upwind, sailed back side for a little way before kicking off again. You just kept charging downwind.When it comes to the jumps and rides, video is perfect for revealing cowardice and inspiring courage. Instead of really exploding on take off, it’s clear to see that you squashed the knees, sheeted out and flopped off the lip rather than rocketing. You won’t do that again. And turning towards a peachy, walling wave, did you open up and keep on climbing and present your nose to the pitching lip? No, you wimp, you over-sheeted, turned early, pretended it wasn’t there and headed for the shore.
More gems of technical joy from Harty in the next issue. Looking for a fine xmas present, you can order his new gybing DVD (and other titles) by emailing harty@peter-hart.com and more at www.peter-hart.com
The post PETER HART THE CAMERA TRAP appeared first on Windsurf Magazine.